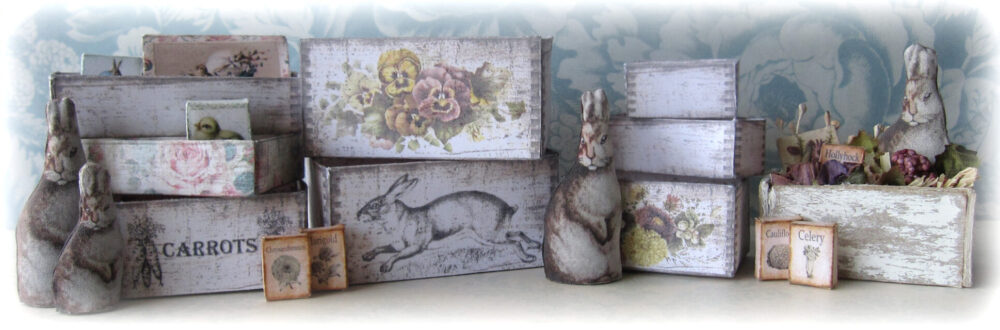
I’ve been busy creating some new miniatures….doll’s dolls!
Perfect for miniature children’s rooms, miniature nurseries, miniature toy shops or under a dollhouse Christmas tree!
Each are completely handmade and have a little item they are holding.
I also made another miniature “bunny box” It’s filled with little handmade momentos with a blue and white color theme. So cute and ready to add to your dollhouse decor! Another cute addition to my miniature momento box line.
You can find these doll’s dolls, bunny box, and other handmade miniatures in my Late Night Coffee Etsy store! I add new ones each week! Just click on pictures above or below.
Summer is a time for playing, relaxing, and having fun! It can also be a great time to reinforce learning skills or learn brand new ones! These fun summer activities for kids are a perfect way to do just that! Each activity is designed to keep children engaged with their learning while having a good time.
Project based learning activities are a great way to teach critical thinking skills, creativity, and learn about a new topic. Each of these activities are structured so you don’t have to do a lot of planning. They are also flexible if you need to adjust for your children. The ocean animal, space, rainforest, and restaurant projects are planned out for ten days of activities. That’s right….TEN DAYS! The bats activity has 5 days of activities. Perfect for summer school, camps, classrooms, or homeschooling!
Click here to find these in my store or click on picture below!
Practice reading skills with these reading games! The reading comprehension game lets children play a board game that asks the most important comprehension questions for any book or story. It’s a great way for a child to see what they have remembered while reading. The empathy game teaches children to think about examples of empathy in stories or books. It asks questions that can lead to great discussions about empathy.
You can find them here in my store or click on the photo below!
Fine motor skills are a great skill to reinforce over the summer! Younger children greatly benefit from using their fingers and hands in controlled ways. It helps with muscle coordination later when they begin to write letters and words. Lacing cards are perfect for not only fine motor skills, but also hand/eye coordination. The island fun pack has a lot of fun tropical-themed objects to cut out and use in easy crafts like gluing onto paper or making decorations.
You can find these in my store here or click on photo below!
Do you have a young or older person that could use some fun practice with fine-motor skills? These stuffed animal-themed lacing cards are a great activity that enhances that skill!
Perfect for: Preschool/Kindergarten Homeschool Nursing Homes/Assisted Living Children’s clubs/Organization Activity Birthday Party Winter/Summer Break Activity Car Trips/Errands
This PDF file includes: 3 pages of stuffed animals (teddy bear, dog, and cat) sized 5.25” x 3.5” (two of same animal on each page) 3 pages of stuffed animals (teddy bear, dog, and cat) sized 7” x 4.” (one on each page) Instruction sheet with visuals.
Need a fun project that will keep your students engaged and learning each day?
Try one of these 10-day project based learning activities!
Each one takes the students into a different world where they get to become different professions that explore our world. Packed with fun and engaging lessons, your class will problem solve different situations as they transform themselves into a marine biologist, rainforest ecologist, space explorer, or restaurant owner.
These lessons are structured so you don’t have to plan too much, but flexible enough to add your own ideas!
Love vintage decor? This DIY vintage style rabbit craft is perfect for anyone who decorates with vintage items! And best of all- NO wood is needed! This craft is also great because you don’t need to be “perfect” with it. It allows for errors and imperfections because it is meant to look vintage and “pre-loved”.
Here are the supplies you will need:
Supplies you will need for rabbit
Printable Rabbit graphics (You can find them in myLate Night Coffee Etsy store) These graphics have a “worn” look to them. They come in 3 sizes-(8 x 4.25 inches, 6 x 3.25 inches, and 4 x 2.25 inches). Each size has two side views for the front and back of piece. Please note: The instructions to make this DIY vintage style rabbit are only on this website. You can print them out directly from here if needed.
Chipboard (or food carton boxes to make your own) You will need pieces that are about 1/16″ or 1mm thick. The length and width you will need will depend on the size of the rabbit you are making (see below in my supply comments.)
Scissors (strong enough to cut through chipboard)
White glue
Glue stick
Paintbrushes (smaller size)
Acrylic Matte Paint (I prefer off-white)
FINE sandpaper
Ruler
Black or dark brown pencil to fill in any errors( if needed )
I will take a moment to comment on the supplies.
Here is the breakdown for the approximate size chipboard you will need for each size rabbit and base:
Large rabbit- (4 pieces that are at least 8.5″ x 5″ each for rabbit) (One piece that is at least 5.5″ x 7″ for base)
Medium rabbit (4 pieces that are at least 6.5″ x 4″ each for rabbit) (One piece that is at least 4.5″ x 5″ for base)
Small rabbit (4 pieces that are at least 4.5″ x 3″ each for rabbit) (One piece that is at least 3.5″ x 5″ for base)
I don’t endorse any one product, but I have found some products work well with this craft.
I like Aleene’s Tacky Glue because it is strong holding, however a good white glue will also work.
If you don’t have off-white paint you can add a little drop of yellow to white paint and make a nice off-white color.
And finally chipboard. I regularly have found stashes of chipboard at thrift stores, so that is where I usually get mine. I also upcycle things with it. You can find chipboard in lots of everyday products like the backs of some notebooks and certain product boxes. Chipboard is just a sturdy, thick cardboard and it is NOT corrugated (wavy on inside). You can also make your own chipboard by layering food product box cardboard together. Here is a video that shows how to make your own.
I will also state for the record that these following instructions are how I made this rabbit. Like any craft, you may find a way to make it easier….or better!
Instructions:
Print and cut out both views of rabbit graphics from paper. ( I leave a little white area around each rabbit because it makes cutting them out easier and less likely to cut too much off of the graphic later on.) GLUE STICK them onto the chipboard. Make sure you cover the whole back with the glue stick. Smooth graphic and let dry on chipboard for 10 minutes or so. Now cut out both rabbits around edge of the actual graphic (cutting off white area). I find if you cut small pieces off one at a time, it saves the graphic from possible wrinkling and your hands from hurting.
Cover the backs of both of these rabbits with WHITE GLUE and glue them onto ANOTHER piece of chipboard. You can put a heavy book on top of these pieces to really help the rabbits adhere. Let dry for at least 30 minutes.
While you are waiting for your glue to dry, cut out your chipboard pieces for your base. The size of base will depend on what size rabbit graphic you are working with:
Large rabbit (8″) – Make four 5″ x 1.5″ pieces
Medium rabbit (6″) – Make four 4″ x 1″ pieces.
Small rabbit (4″) – Make four 3″ x 1″ pieces
Cut out rectangles and glue each piece on top of each other until you have a “block”. You will now have a 4 layer base. Don’t worry about imperfection when cutting, it will add to the the “aged” look.
When rabbits have dried, cut out both rabbits around the actual graphic again. Cutting small pieces as you go is easier. Don’t worry if your cutting doesn’t look perfect or isn’t matching up. It’s supposed to look old AND the next steps will help make it look less obvious. Each rabbit piece is now two layers thick. Each should be about 1/8″ thick.
Cover the back of one of the rabbits with white glue (get all the edges!) and glue to back of other rabbit. Let dry and use heavy book to weigh down if you need. Let dry for 30 minutes. You now will have one rabbit piece that is 4 layers thick. (See how imperfect mine is!) This 4-layer thickness should be about 1/4″ thick.
Now, break out that FINE sandpaper . You are going to GENTLY sand the sides of your rabbit AND base so they are a little more flush and smooth like a piece of wood. Again, don’t worry about making the sides perfectly smooth. You need some imperfections to make the piece look older.
Now, it’s time to get out the paint. Dip a LITTLE amount of paint onto the small paintbrush. You will now dab/swipe small amounts here and there on sides of rabbit piece. Don’t cover all the layered chipboard. It’s supposed to look like some has worn/faded/chipped off. Paint around the rabbit sides (except bottom side). Now, paint the base. Use same dab/swipe technique with side edges. The top can be painted with bigger brush, but use a little so you can still see some chipboard through. You can choose to paint bottom or leave plain, depending on your preference and where it will be displayed.
Break out that FINE sandpaper again, and GENTLY sand the edges, top,and sides of base. You goal is to make it look aged, so use alight touch while anding.
Spread white glue on the bottom of rabbit piece and place in center of base. Hold down firmly for a minute or two to make sure it is adhered. Let dry. I don’t put a sealer on because it sometimes it smears the printer ink and I like the flat “old wood” look. But you, of course, are free to do what you would like with the rabbit and base to protect it.
And…it’s done! Time to find a nice spot for your piece! I hope you enjoyed making your vintage style rabbit!
I have always loved everyday objects that have been miniaturized like these dollhouse miniature dolls. When I was little, I absolutely loved dollhouses and all the little items you could put in them. It was so fun decorating each room and wondering what it would be like to live in the room I would create.
As I got older and started enjoying art, I began creating miniatures for my own enjoyment and then to sell. I found what I loved was creating little items that looked vintage. It is so much fun to find an item from another era and recreate it in miniaturized form.
I started to make these little animal dolls during the pandemic. It took a lot of time to figure out how to make each one so that they looked like the dolls from the 1800’s. They each measure between 1- 2 inches, have a flat bottom, and are stuffed with wool. Each one is a labor of love.
You can find my most recent cloth animal dolls in myEtsy store! Check back often as I add new ones frequently. Perfect for dollhouses or doll/miniature collectors!
You can also see my past dolls and miniatures I have created on my Dollhouse Miniatures board on Pinterest!
Have a little one who loves animals? This printable features 24 farm animal flash cards made with vintage B&W illustrations from the 1800’s and early 1900’s. Perfect for learning about animals or using in a junk journal/scrapbook!
Each measure 3 7/8″ high x 2.25″ wide and feature the name of the animal.
Also included is a quilt graphic from a quilt made in the 1800’s. It measures 8.5″ x 11″ and can be used as a back design for the cards, if desired.
Perfect for: Preschool/Kindergarten Homeschool Nursing Homes/Assisted Living Winter/Summer Break Activity Car Trips/Errands
Like junk journals and scrapbooking?
These cards are perfect for making journal cards or other embellishments for your papercrafting!
This 5-page PDF file includes: 3 pages of black & white flashcards featuring farm animals (8 on each page) 1 page of quilt design graphic Directions sheet
All images are high resolution 300 dpi and are set to print on US Letter Size (8.5” x 11.5”)