It’s that time of year again where pumpkins, bats, and sweet treats make their annual appearance! You can make it an even more memorable, fun, and great learning experience for your students with these great Halloween activities. These games, learning activities, and craft projects will help bring a little “spooky” fun to your classroom for the holiday. You can find them all in my Late Night Coffee Tpt store or click on the individual pictures below to take you to the product!
Need some easy Halloween decorations and tags that you can print to go along with your Halloween activities? Check out my digital designs from my Late Night Coffee on Etsy store! No need to run to the store for your fun Halloween items. Just print…..cut….and use! And best of all…you don’t need an Etsy account to buy items….you can check out as a guest!
Halloween dollhouse miniature photos you can print at home!
This fun holiday is a time for thrills and chills and when the past and the present merge in the most enchanting way. If you’re a dollhouse enthusiast or a Halloween lover, I have something special for you – printable Halloween dollhouse miniature photos straight from the 1800s! These hauntingly beautiful images are digitally distressed to look old and spooky, and they’re perfect for adding a touch of eerie elegance to your dollhouse.
Easy to Print and Use!
Getting these photos into your dollhouse is a breeze. Simply print them out on your home printer, cut them to size, and you’re ready to decorate! They fit seamlessly into your dollhouse without any fuss.
Mix and Match !
These printable photos can be mixed and matched with your existing dollhouse decor or used in a brand new spooky scene. Create a Victorian parlor, a haunted library, or even a creepy attic filled with these eerie portraits. There are 24 womens’ photos and 19 mens’ photos in both black & white and sepia color .
Ideal for Collectors
If you decorate your dollhouse for Halloween, these photos are a must-have addition for your collection. They’re a unique and rare find that will impress fellow collectors and enthusiasts.
So, whether you’re a seasoned dollhouse hobbyist or just getting started, these miniature photos will let your dollhouse come alive with these hauntingly beautiful images!
Create magical moments with this Halloween Sewing Fairy printable!
Are you looking for a delightful decoration or a thoughtful thank-you gift for a talented seamstress in your life? Look no further! Introducing this printable Sewing Fairy – a charming, easy-to-make creation that will add a touch of magic to any sewing room.
Simple as 1-2-3!
Creating this printable Sewing Fairy is as easy as ABC. All you need is a printer, a few sheets of paper, scissors, and glue. Just download the file, hit print, and watch the magic happen! Once printed, it’s a breeze to assemble – no fairy dust required.
A Stitch in Time
The printable Sewing Fairy features a fairy holding a large sewing needle, ready to embark on sewing adventures. It’s a tribute to the art of sewing and the talented seamstresses who bring fabric to life.
Unleash Your Creativity
In addition to being a great decoration on its own, you can customize it to make it even more special! Use your artistic skills to add your own creative touches. Add some thread to the needle, some glitter to her wings, or a little note at the bottom. The possibilities are endless, just like your imagination.
Perfect for Saying “Thank You!”
Have someone who is making a costume for you? This little fairy is sweet way to let them know you appreciate all the work that went into your holiday festivities.
In just a few simple steps, you can bring this enchanting Halloween Sewing Fairy printable to life. Whether you’re a seasoned seamstress or just starting your sewing journey, this little fairy is a wonderful addition to your crafting world. Download, print, create, and watch your sewing space transform into a realm of imagination and creativity.
Leave that gift bag on your kitchen table this morning? Want to take some cookies to the neighbor but don’t want to use a whipped cream bowl? Need an easy gift box for that gift your group is making today?
You have a nice gift…..but now you need a nice looking box!
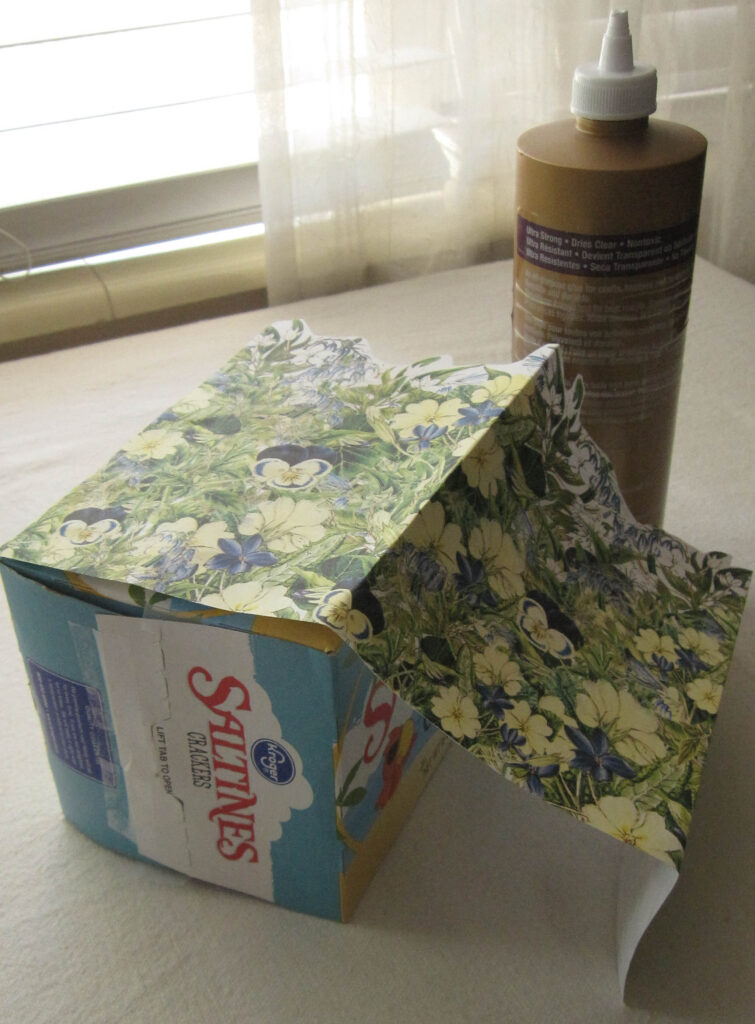
Well, you are in luck because here’s a gift box that you can make in about 10 minutes! Seriously, the box pictured took me about ten minutes (minus the time spent taking the photos).
Here are the four things you will need:
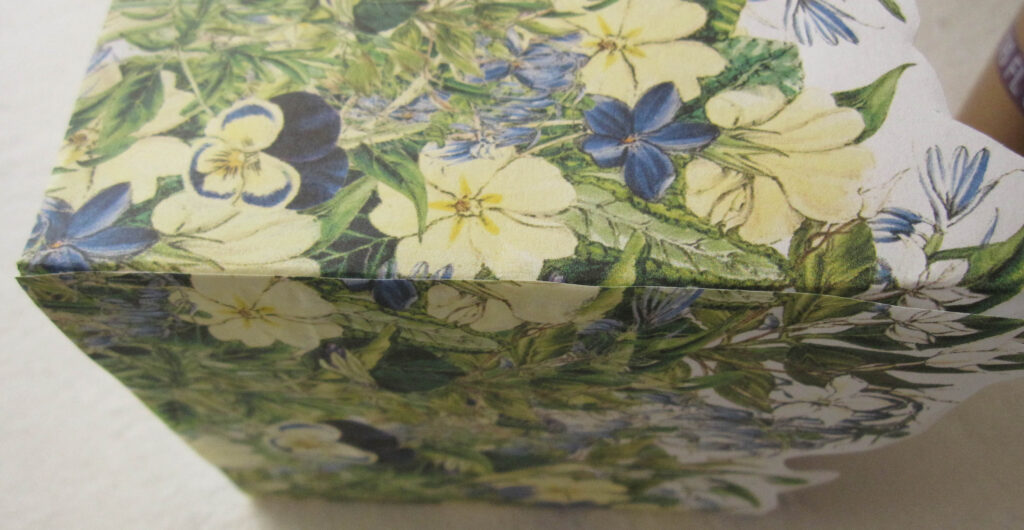
Floral paper printable (You can find it in my Etsy store here) I printed on plain copy paper.
Small box (clean food box or small shipping box)
Scissors
Glue
Materials needed
Directions (which can only be found on this website):
Cue “Mission Impossible” music.
Get your box. Cut it to the size you need or just use it if you like the size. For my saltine box…. I undid flaps, flattened it, cut it in half, and taped bottom flaps back together. If you are using a regular cardboard box, cutting the top flaps off will give you sturdy sides on the box for this quick project.
Print floral paper printable. The sheet is 11.5 inches across. You will need to measure around the outside the box you are going to use to know how many pieces to print. Yay math! I used a half of a saltine box and needed two sheets of it….just for reference. Cut out floral graphic from the rest of the white space on paper(s). You can be as concise or as “close enough!” as you want with this. I’m more of a “close enough” kind of person….especially in time crunches.
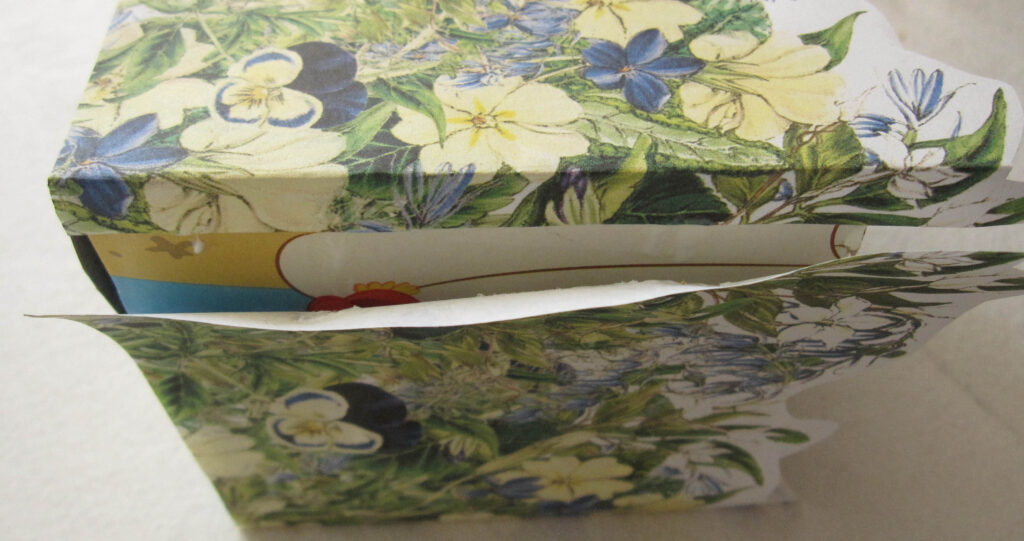
Next, place the floral graphic up to box. If it is too tall, cut off the bottom edge to desired height. You will want some of the floral part to go above the sides. Now, start gluing the paper around outside of box. If you can, crease the paper at edges for better fit. Glue, smooth, glue, smooth……..glue….smooth.
If you want a smoother transition on edges, crease the edge, add glue, and place other piece over it.
And VOILA!! You have your box! Now if you have time and some floral paper left over, you can glue a piece to the bottom. But really….who looks at the bottom of the box anyway? And besides….we are in a time crunch, people!
Now, if you are in a real pinch, you can use cut/shredded scrap paper, tissue paper, paper bag, or whatever you have that is convenient. Cut…..fluff…..and place in box. Put your gift or items in…and you are done! (Your items will probably be more “gift-like” than mine…although some people might actually appreciate a nice package of tuna) Give yourself a pat on the back and take a breath! You did it!
You can now turn off the “Mission Impossible” music.
Do you have a vintage style junk journal or scrapbook? Need a fun and unique gift tag? This vintage journal tags printable features antique luggage, dog, and hotel tags from the late 1800’s and early 1900’s. Perfect for anyone who loves the look of old items from the past! You can find this set of tags in my Late Night Coffee Etsy store!
Celebrate the beauty of spring and spring crafts with these vintage spring clip art illustrations!
Each black and white illustration is from the late 1800’s to early 1900’s and is perfect for junk journals, scrapbooking, cardmaking, or any other craft that uses clip art!
Love vintage decor? This DIY vintage style rabbit craft is perfect for anyone who decorates with vintage items! And best of all- NO wood is needed! This craft is also great because you don’t need to be “perfect” with it. It allows for errors and imperfections because it is meant to look vintage and “pre-loved”.
Here are the supplies you will need:
Supplies you will need for rabbit
Printable Rabbit graphics (You can find them in myLate Night Coffee Etsy store) These graphics have a “worn” look to them. They come in 3 sizes-(8 x 4.25 inches, 6 x 3.25 inches, and 4 x 2.25 inches). Each size has two side views for the front and back of piece. Please note: The instructions to make this DIY vintage style rabbit are only on this website. You can print them out directly from here if needed.
Chipboard (or food carton boxes to make your own) You will need pieces that are about 1/16″ or 1mm thick. The length and width you will need will depend on the size of the rabbit you are making (see below in my supply comments.)
Scissors (strong enough to cut through chipboard)
White glue
Glue stick
Paintbrushes (smaller size)
Acrylic Matte Paint (I prefer off-white)
FINE sandpaper
Ruler
Black or dark brown pencil to fill in any errors( if needed )
I will take a moment to comment on the supplies.
Here is the breakdown for the approximate size chipboard you will need for each size rabbit and base:
Large rabbit- (4 pieces that are at least 8.5″ x 5″ each for rabbit) (One piece that is at least 5.5″ x 7″ for base)
Medium rabbit (4 pieces that are at least 6.5″ x 4″ each for rabbit) (One piece that is at least 4.5″ x 5″ for base)
Small rabbit (4 pieces that are at least 4.5″ x 3″ each for rabbit) (One piece that is at least 3.5″ x 5″ for base)
I don’t endorse any one product, but I have found some products work well with this craft.
I like Aleene’s Tacky Glue because it is strong holding, however a good white glue will also work.
If you don’t have off-white paint you can add a little drop of yellow to white paint and make a nice off-white color.
And finally chipboard. I regularly have found stashes of chipboard at thrift stores, so that is where I usually get mine. I also upcycle things with it. You can find chipboard in lots of everyday products like the backs of some notebooks and certain product boxes. Chipboard is just a sturdy, thick cardboard and it is NOT corrugated (wavy on inside). You can also make your own chipboard by layering food product box cardboard together. Here is a video that shows how to make your own.
I will also state for the record that these following instructions are how I made this rabbit. Like any craft, you may find a way to make it easier….or better!
Instructions:
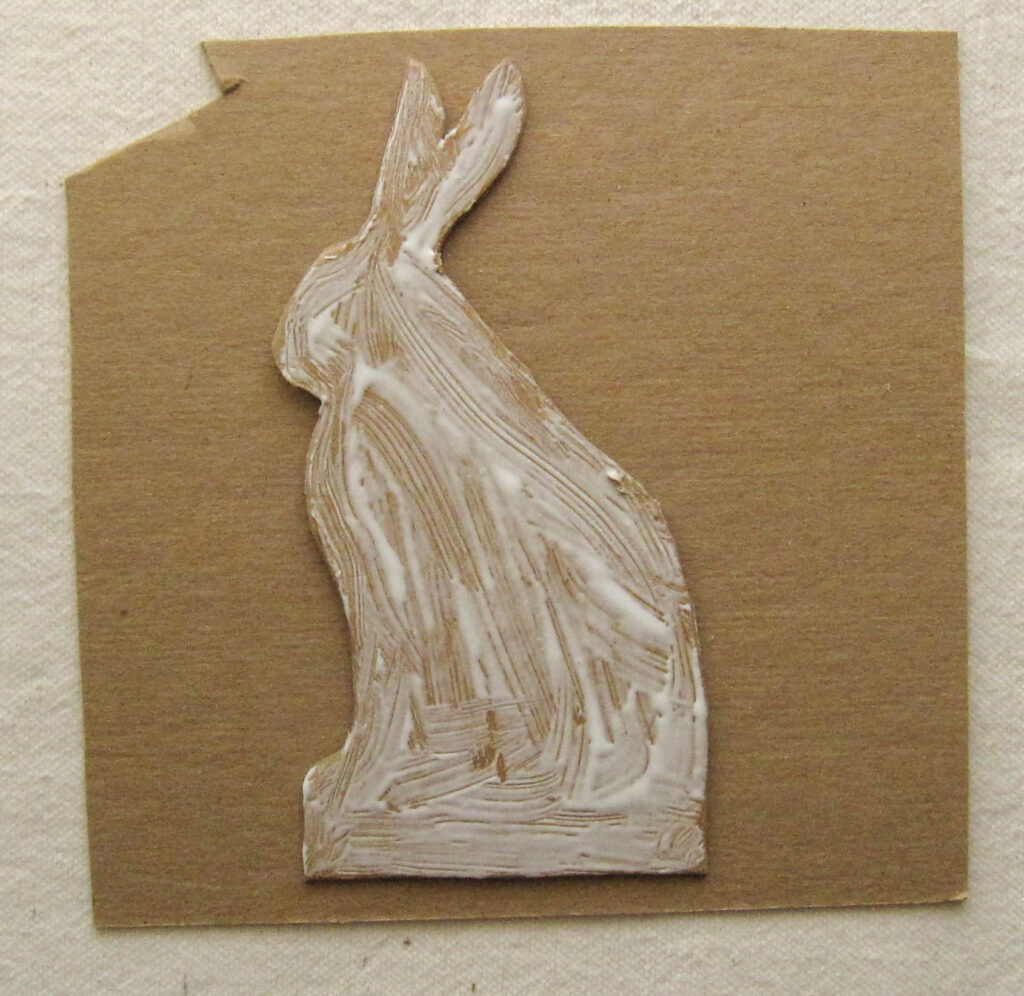
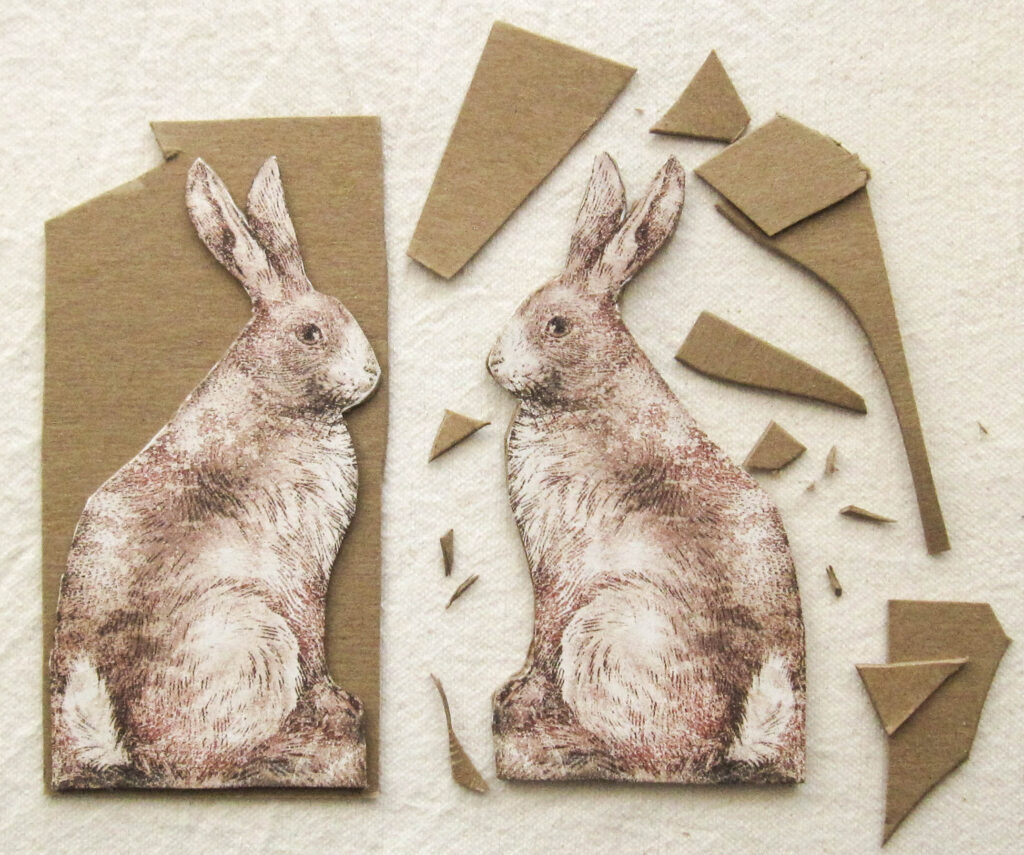
Print and cut out both views of rabbit graphics from paper. ( I leave a little white area around each rabbit because it makes cutting them out easier and less likely to cut too much off of the graphic later on.) GLUE STICK them onto the chipboard. Make sure you cover the whole back with the glue stick. Smooth graphic and let dry on chipboard for 10 minutes or so. Now cut out both rabbits around edge of the actual graphic (cutting off white area). I find if you cut small pieces off one at a time, it saves the graphic from possible wrinkling and your hands from hurting.
Cover the backs of both of these rabbits with WHITE GLUE and glue them onto ANOTHER piece of chipboard. You can put a heavy book on top of these pieces to really help the rabbits adhere. Let dry for at least 30 minutes.
While you are waiting for your glue to dry, cut out your chipboard pieces for your base. The size of base will depend on what size rabbit graphic you are working with:
Large rabbit (8″) – Make four 5″ x 1.5″ pieces
Medium rabbit (6″) – Make four 4″ x 1″ pieces.
Small rabbit (4″) – Make four 3″ x 1″ pieces
Cut out rectangles and glue each piece on top of each other until you have a “block”. You will now have a 4 layer base. Don’t worry about imperfection when cutting, it will add to the the “aged” look.
When rabbits have dried, cut out both rabbits around the actual graphic again. Cutting small pieces as you go is easier. Don’t worry if your cutting doesn’t look perfect or isn’t matching up. It’s supposed to look old AND the next steps will help make it look less obvious. Each rabbit piece is now two layers thick. Each should be about 1/8″ thick.
Cover the back of one of the rabbits with white glue (get all the edges!) and glue to back of other rabbit. Let dry and use heavy book to weigh down if you need. Let dry for 30 minutes. You now will have one rabbit piece that is 4 layers thick. (See how imperfect mine is!) This 4-layer thickness should be about 1/4″ thick.
Now, break out that FINE sandpaper . You are going to GENTLY sand the sides of your rabbit AND base so they are a little more flush and smooth like a piece of wood. Again, don’t worry about making the sides perfectly smooth. You need some imperfections to make the piece look older.
Now, it’s time to get out the paint. Dip a LITTLE amount of paint onto the small paintbrush. You will now dab/swipe small amounts here and there on sides of rabbit piece. Don’t cover all the layered chipboard. It’s supposed to look like some has worn/faded/chipped off. Paint around the rabbit sides (except bottom side). Now, paint the base. Use same dab/swipe technique with side edges. The top can be painted with bigger brush, but use a little so you can still see some chipboard through. You can choose to paint bottom or leave plain, depending on your preference and where it will be displayed.
Break out that FINE sandpaper again, and GENTLY sand the edges, top,and sides of base. You goal is to make it look aged, so use alight touch while anding.
Spread white glue on the bottom of rabbit piece and place in center of base. Hold down firmly for a minute or two to make sure it is adhered. Let dry. I don’t put a sealer on because it sometimes it smears the printer ink and I like the flat “old wood” look. But you, of course, are free to do what you would like with the rabbit and base to protect it.
And…it’s done! Time to find a nice spot for your piece! I hope you enjoyed making your vintage style rabbit!